
Hello everyone,
We hope you remember that it's time for our monthly Mixed Media Academy! :)
We've already had fun with backgrounds and played with stencils, today we'd like to show you some creative ways to use STAMPS.
We'd like to encourage all of you to experiment and Spread Your Wings! Whether you are a beginner or a well-seasoned artist, whether you're planning large scale creations or simple modest ones - we hope you'll find our ideas, tips & tricks inspiring!
Enjoy!


I love journaling, but I have to work in layers. A good way to do that is to add some Modeling Paste at the very beginning and stamp into it while it's still wet. Then stamp on top of it with white acrylic paint and archival inks as another separate layer. Here's an example.
I started with a journal and some Elementals Canvas Resist Borders. I used the scrap portion of the borders and some
paper strips for my first layer.
Next a layer of Clear Gesso in parts of
the page. Add a layer of Modeling Paste with a palette
knife like overlapping your papers and borders in spots. Apply it like a
swirling cake frosting. Let dry for a few minutes and then stamp into the
paste with a Cling stamp that you've lightly sprayed with water. Add images in
the paste all over with different stamps.


When dry, spray with different colors of
bright inks. Be careful to dry in between sprays, but let them run together
in spots as well. You can see that the inks go down
into the stamped paste and create a really great contrast.

My next step was to tap white acrylic paint onto the stamp using a piece
of a foam square. Make sure you spray the stamp with water and clean
before the paint dries. These great Turquoise Rubber stamps clean up
wonderfully with water and a scrub-mat or old terrycloth towel.

Finally I started adding white pen marks,
stenciling and black archival ink stamping for more contrast.
This is
the background for your 2 journal pages. You can now add stencil paste,
journaling, pictures, beads, mechanicals....whatever you like. The really bright
background colors leave plenty of room for different ideas. Or just leave it as
it is.


Hi everyone ;)
It's Marta here! I am so very happy to share with you my two funky ways of using stamps.
I have also a sneak peak of finished journal using my tricks.
My first tip is TISSUE STAMPING.
You will ask why ?
It's for those who are afraid that the stamped image won't be perfect on the project, or you are not too sure where to stamp it. By having stamped image on the tissue you can try here and there and decide where to place it ;) by glueing it.

My second idea is STAMPING ON WOOD.
Those little wooden pieces are from the backing of most canvases.
I've been collecting them for ages! You may remember my recent 'Dream On' canvas in which I am creating the whole background out of those wooden pieces.
You can add them to every project - journal, cards, canvases - it could make a perfect title.

And here is a sneak peak of my journal page ;) I hope you will find some inspiration today !


Today I would like to share with you a technique I have seen shared quite a number of times via different tutorials over the past few years and one I have even shared myself on my blog before.
HOWEVER, this one is different as I wanted to attempt it with Art Ingredients Mica Powder this time, and guess what? It was a 100% shimmery shiny micary (yes of course it is a word, right?) success.
With such a small amount of mica powder on your brush you can make such a gorgeous colour and then once you place that added background stamp, the final touch is perfection.
So let's begin, time to talk stamping into UTEE (Ultra Thick Embossing Enamel), prepare to be amazed.
Step 1 - Die cut in thick card your shape and give it a nice coat of Art Basics Heavy Black Gesso.
Step 2 - You will need to Versamark your shape and emboss with Black UTEE three times. Yep, 3 times, you need a nice thick coating. By three times I mean heat emboss three individual times, emboss and heat, emboss and heat, emboss and heat.
Step 3 - Versamark your shape, in order for Mica Powder to stick. Take your Mica Powder and a soft brush and lightly randomly brush your colors on, a choice of three colors seems to work the best
Step 4 - Ink up your stamp with gold ink, very important not to miss this step as you will need to work fast for step 5.
Step 5 - Using your heat gun once again melt the UTEE on your shape, once you see it starting to become liquid immediately pick up your stamp and stamp into your shape. Gently remove stamp, look what you now have!!!


I love stamps! They are versatile and can change the mood or
the look of a project totally. While my favorite medium to use with the stamps
is Jet Black or Watering Can Archival Ink, there’s way more mediums you can
stamp with.
I created these simple little ATCs by stamping with three
different mediums.

They all give a different, specific look none of which is
quite as detailed as the one using ink. But these kinds of images are perfect
for backgrounds or just as the vocal point in a CAS style card.
As the mediums are wetter than normal, regular ink, the images also look wetter. That is to say they have a watercolor look to them.
As the mediums are wetter than normal, regular ink, the images also look wetter. That is to say they have a watercolor look to them.
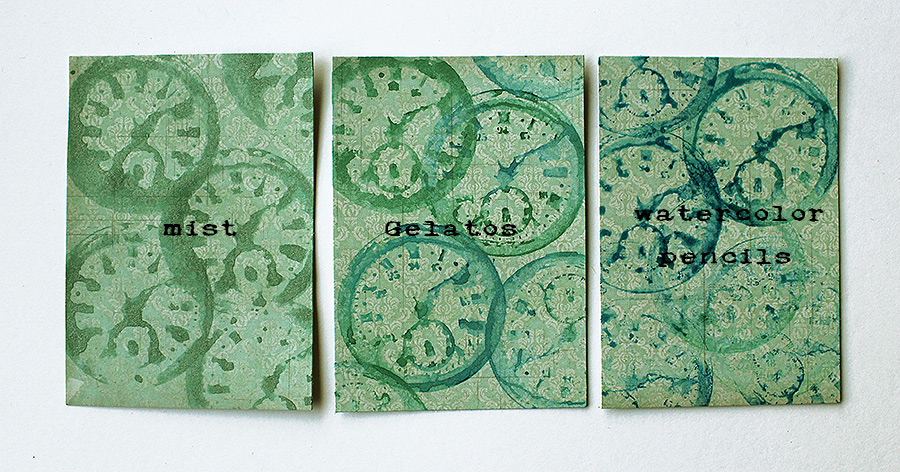
1) The first background is made by stamping with
mist. Just spray some mist to your craft sheet or a piece of plastic and use
that pool of mist like an ink pad. You can use just one color in the stamp as
mixing two would only result a mixed colored mist pool. This is the smudgiest
of the three.

2) The second background is stamped using watercolor pencils. First add a touch of water to the stamp either by misting it
delicately or rubbing the surface with a wet finger. Then color the stamp using
the pencils.
You can mix different colors as you can add them individually. The
outcome is the most detailed as this techinique has the least amount of water
involved.

3) The third background is made using Gelatos. You
have two choices – either add some water first to the stamp and then color or
vice versa.
As the Gelatos are creamier, heavier than water color pencils they
might need an extra touch of water to really transfer the image. Like with the
pencils, you can again mix colors within one image as you add each color on its
own.

To unify the three I then added stamping also by using
Archival Ink. What’s you favorite medium to use with stamps?

So here we are - we all hope you enjoyed today's post and that we made you run to your desk and stamp your hearts away.! ;)
Don't hesitate if you have any questions to ask us and -
Please, feel most welcome to show your projects in our super friendly and creative Finnabair & Friends Open Studio group on facebook. We'll be looking forward to seeing you there!
Hugs,
Finnabair & The Team

15 comments:
Awesome ideas DT!!! It's always great to learn new ideas and media for stamping! I can't wait to begin trying these ideas out!!!
Wow, amazing projects and info here. Thanks ladies!!!
Fabulous projects and techniques ..TFS !
Muito obrigada pelas ótimas sugestões... vou testar todas elas.
Vocês são generosas em nos ensinar e fabulosas criadoras de belos projetos!
Abraços, diretamente do Brasil,
Marlei
Thanks ladies
CORINNE
I love this! Lots of ideas to try out, but I especially love the brooch. I always have the urge to take my art journaling off the page. Creating a little brooch would be a great way to do this!!
Linda, Marta, Becca and Riikka - you all gave us lots of wonderful and very useful information. I love the Spread Your Wings Academy! And, your projects were all beautiful! Thank you so much for sharing your knowledge.
Thank you ladies for your great stamping ideas:)
Learned some really great techniques! Awesome projects from the design team!
Those are great tips. I will try some of the techniques. Thanks for sharing with us. Johanne Lacombe
You guys rock!!!!!!!!! The best blog EVER!!!!!!!! So educative!
Great tutorials, can't wait to try a couple of these!
Rebecca I am in love with this technique....the colors and textures in your pin are just fabulous!!!!
Great shares x thank you x
Wonderful ideas! Thanks everyone!
Alison x
Post a Comment